When building or updating your website, sometimes you need to limit access to one or more pages. Whether it’s a new client deliverable or an internal staging site, accidentally leaving work-in-progress publicly accessible can pose serious risks. Security through obscurity is a fine posture for some, but when brand reputation or user confusion is on the line, you might want to consider locking things down.
That’s where Netlify’s access control features come in. Sure, you can roll your own authentication layer using an identity provider like Auth0 but that is not a trivial effort and it comes with added expense and complexity.
Consider the following two strategies for protecting sites, without the overhead:
-
Password protection (available on the Pro plan and above): enable a site-wide password directly in the dashboard. This is the simplest and most polished option, especially when working with clients, stakeholders or non-technical users.
-
Basic Authentication via _headers (available on all plans): configure authentication rules in a special text file that lives in your repository. This strategy affords you per page granularity but requires some manual effort. This approach is better suited for demos or temporary restrictions.
Both of these options let you control access but the strategy you use could depend on a few different factors. In this guide, we’ll walk through both approaches step by step, and highlight how freelancers, agencies, and development teams can use them effectively.
Not every project is ready for prime time
For freelancers and agencies, this usually means creating a space where clients can see progress and give feedback without stumbling into half-finished pages. Netlify makes this easy: each branch you push gets its own dedicated preview link. With password protection you can wrap that link in a simple gate. Add a custom domain and HTTPS, and suddenly your preview site feels just as polished as the final deliverable. Only the client with proper credentials can gain access. The difference between “unfinished work floating around online” and “a professional private preview” is just one setting away.
For development teams, the concern is often about keeping staging builds under control. You don’t want someone outside the company, like an SEO bot or a competitor, stumbling across an unfinished release.
With Netlify you can choose between two types of protection, depending on how your team works.
-
Basic protection is the lighter-weight option: a single password that everyone on the review list shares. It’s easy to set up and quick to rotate if it gets passed around too widely.
-
Team protection, on the other hand, ties directly into your Netlify team membership. Instead of passing around a password, reviewers log in with their own Netlify account. This means access is tied to trusted individuals– not shared secrets which is clearly a better fit if your organization requires governance controls.
When paired with the team audit log, you can see when protections were switched on or off, which can be important for regulated industries, or simply for keeping internal review cycles accountable.
In either case, the goal is the same: keep the right people in the loop, and keep everyone else out.
Assessing your options
Before you decide how to proceed, it’s important to know which features are available based on your pricing plan.
If you’re on the Pro plan (or higher), you can turn on password protection directly in the project dashboard. This is the most straightforward and polished option.
If you’re on the Free or Personal plan, you can still keep things private, it’s just a little more hands-on. Instead of a dashboard toggle, you can add a small configuration file to your repository that tells Netlify to require a username and password. This is a handy solution for protecting individual routes but may be a challenge if the password you want to use is a sensitive value.
Think about what you’re trying to accomplish. Do you need a frictionless, client-ready preview workflow? Password protection on the Pro plan is designed for exactly that. Do you just need to keep a demo from being indexed by search engines until tomorrow’s meeting? Basic Auth gets the job done without an upgrade.
Taking a moment to assess your goals will help you identify the right path forward before getting into the weeds.
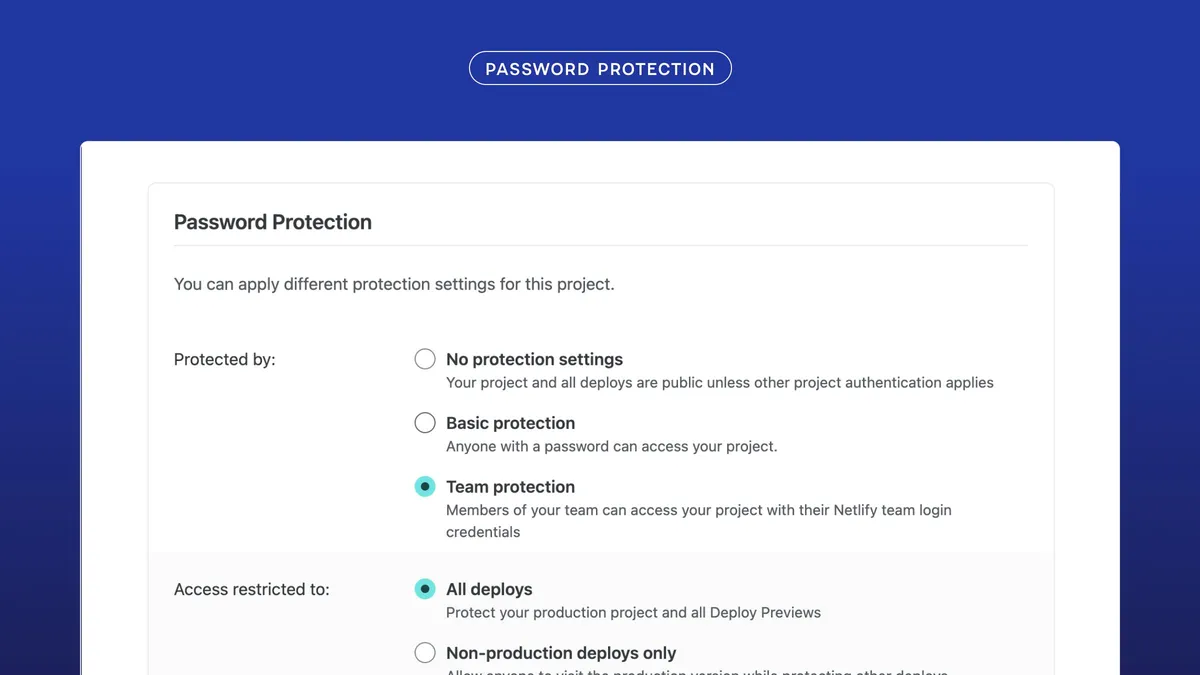
Password protection (Pro plan feature)
If you’re on the Pro plan or higher, password protection is built directly into the Netlify dashboard. This option is easy to set up, especially for non-technical team members and is the most polished turn-key approach for your clients or stakeholders.
-
Open your project settings:
- In the Netlify dashboard, go to the site you want to protect.
- From the left-hand menu, navigate to Project configuration → General → Visitor access
-
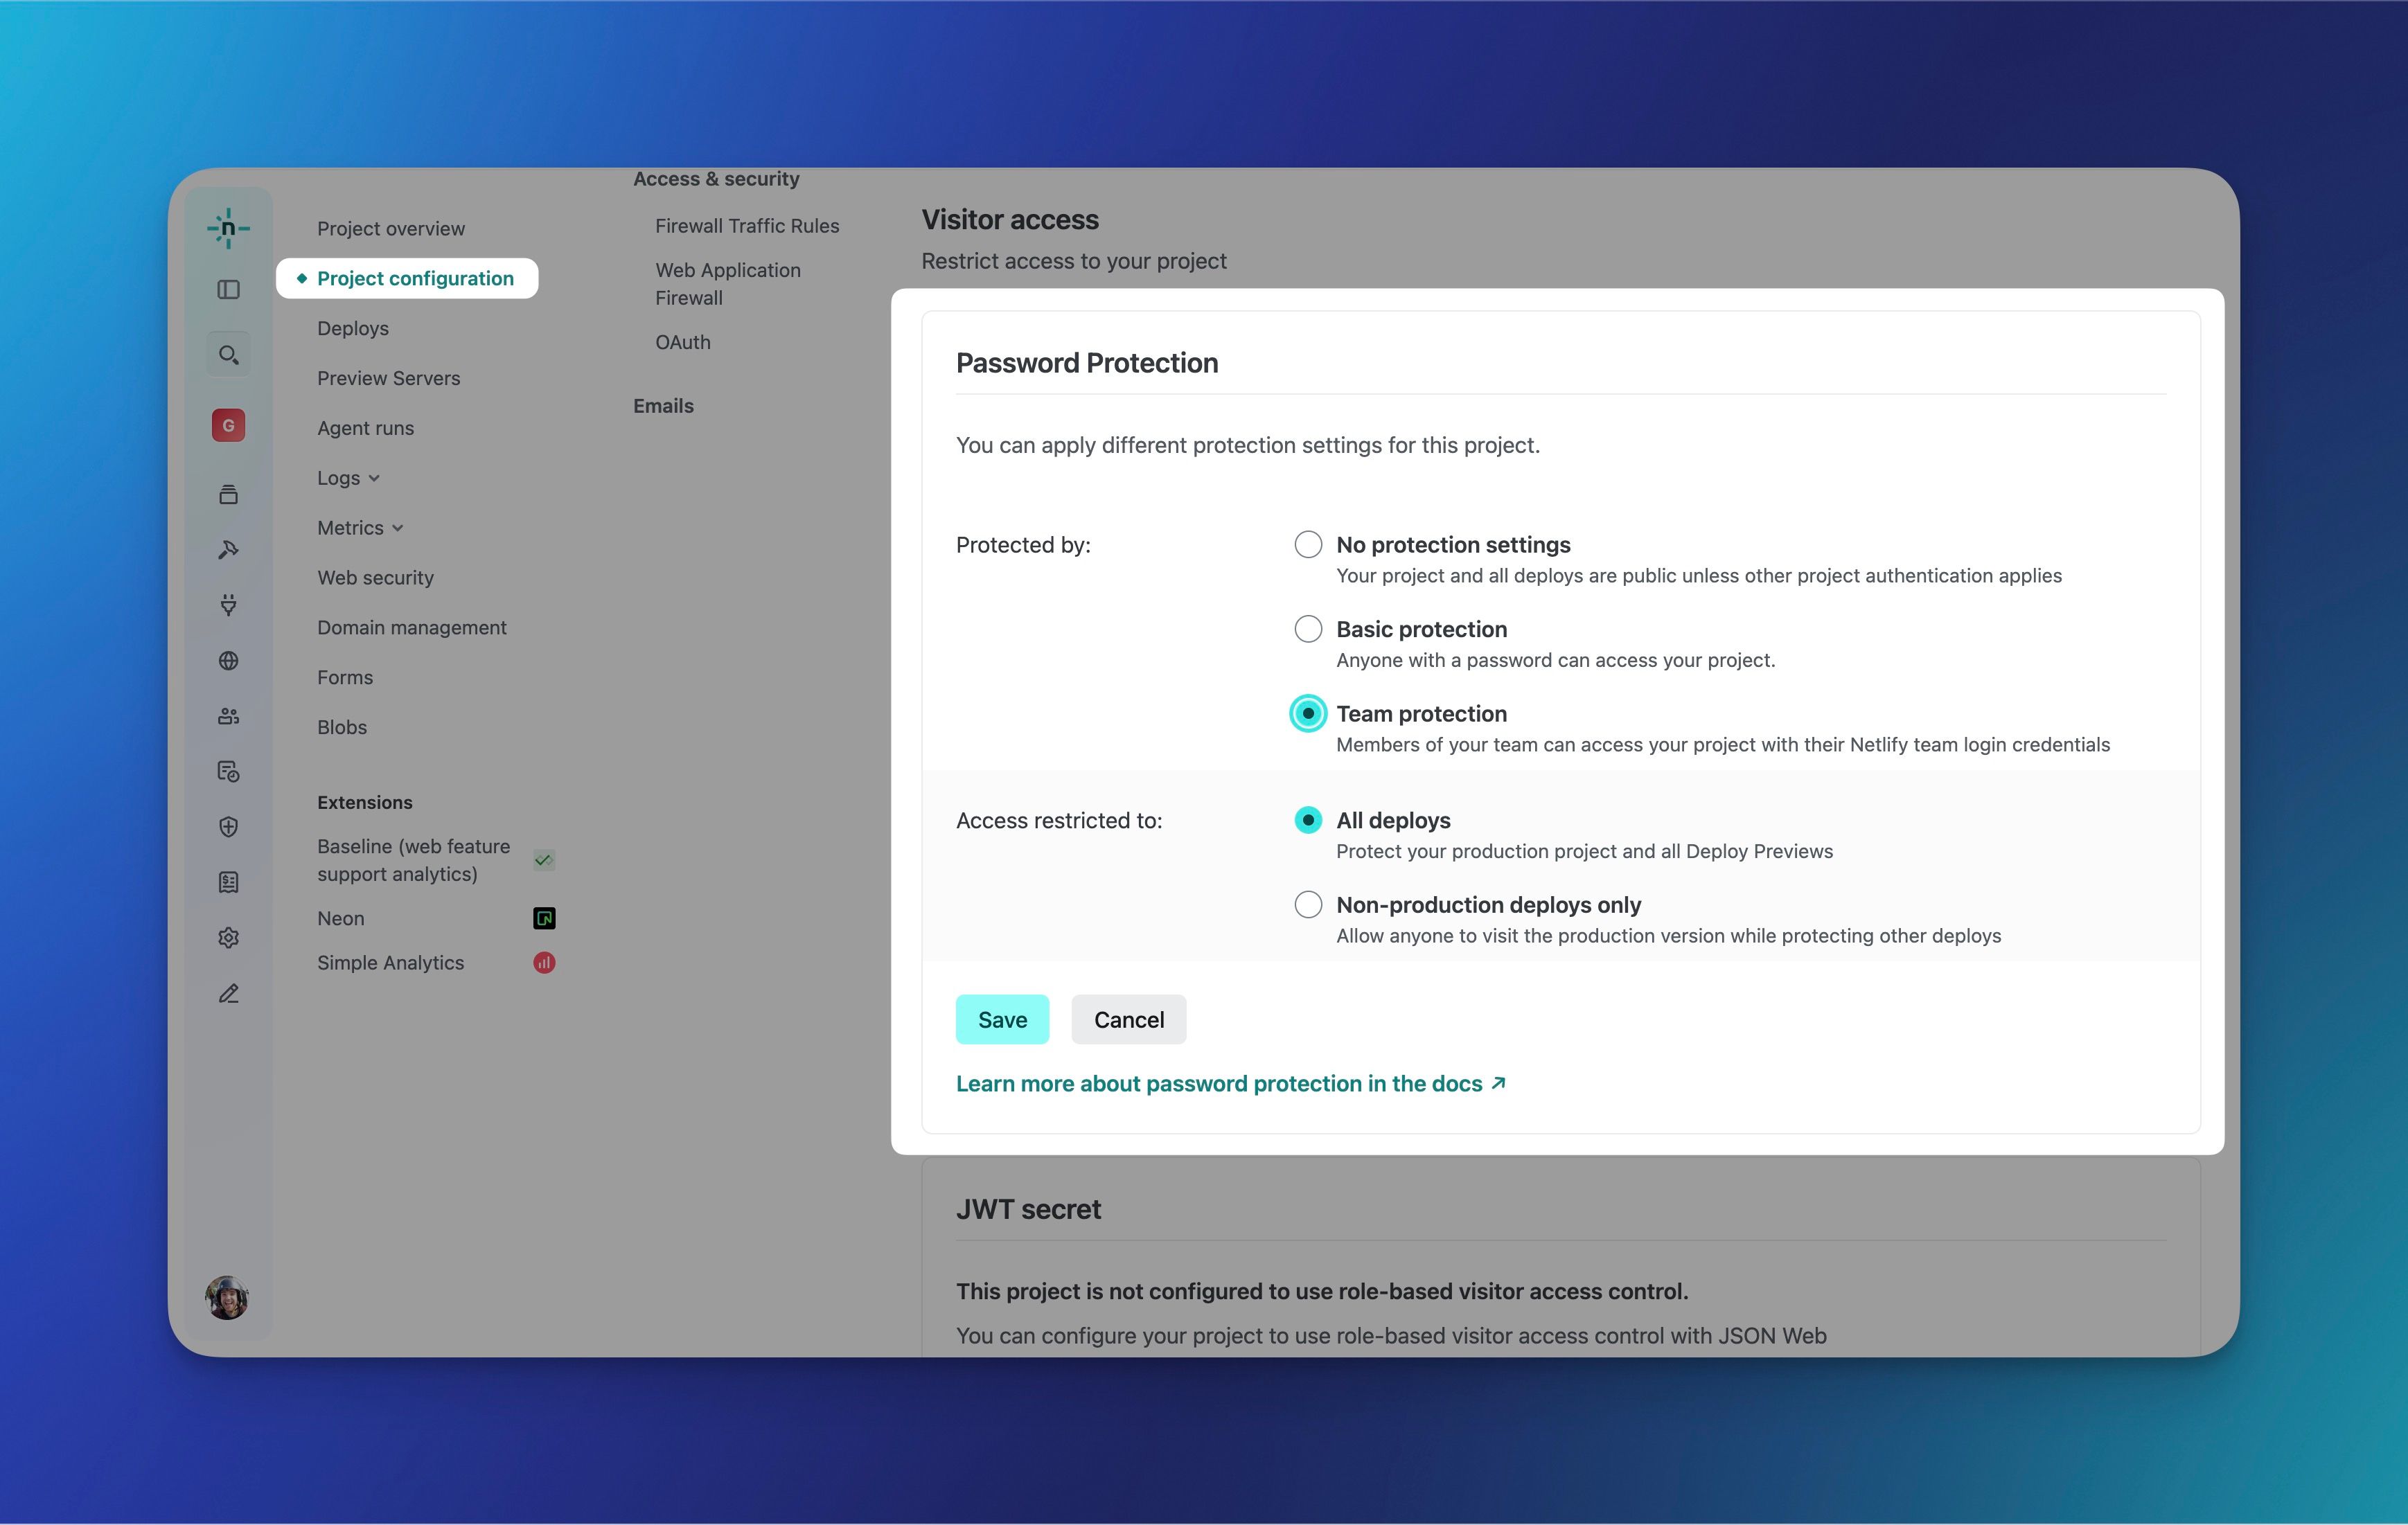
Under ‘Password protection’, choose your protection type:
- Basic protection — Set a single password that you can share with clients, stakeholders, or external reviewers. Everyone uses the same password to get in.
- Team protection — Restrict access to members of your Netlify team. Reviewers log in with their own Netlify account instead of a shared secret. This option is better for organizations that prioritize governance controls.
-
Set the scope of protection, e.g. “Access restricted to:”
- All deploys — Every environment is gated, including production.
- Non-production deploys only — Production remains public, but Deploy Previews and branch deploys are protected. This is a great choice if you want to keep your live site accessible but require credentials for work-in-progress.
-
Save changes
- Once you click ‘Save’ the protections take effect immediately.
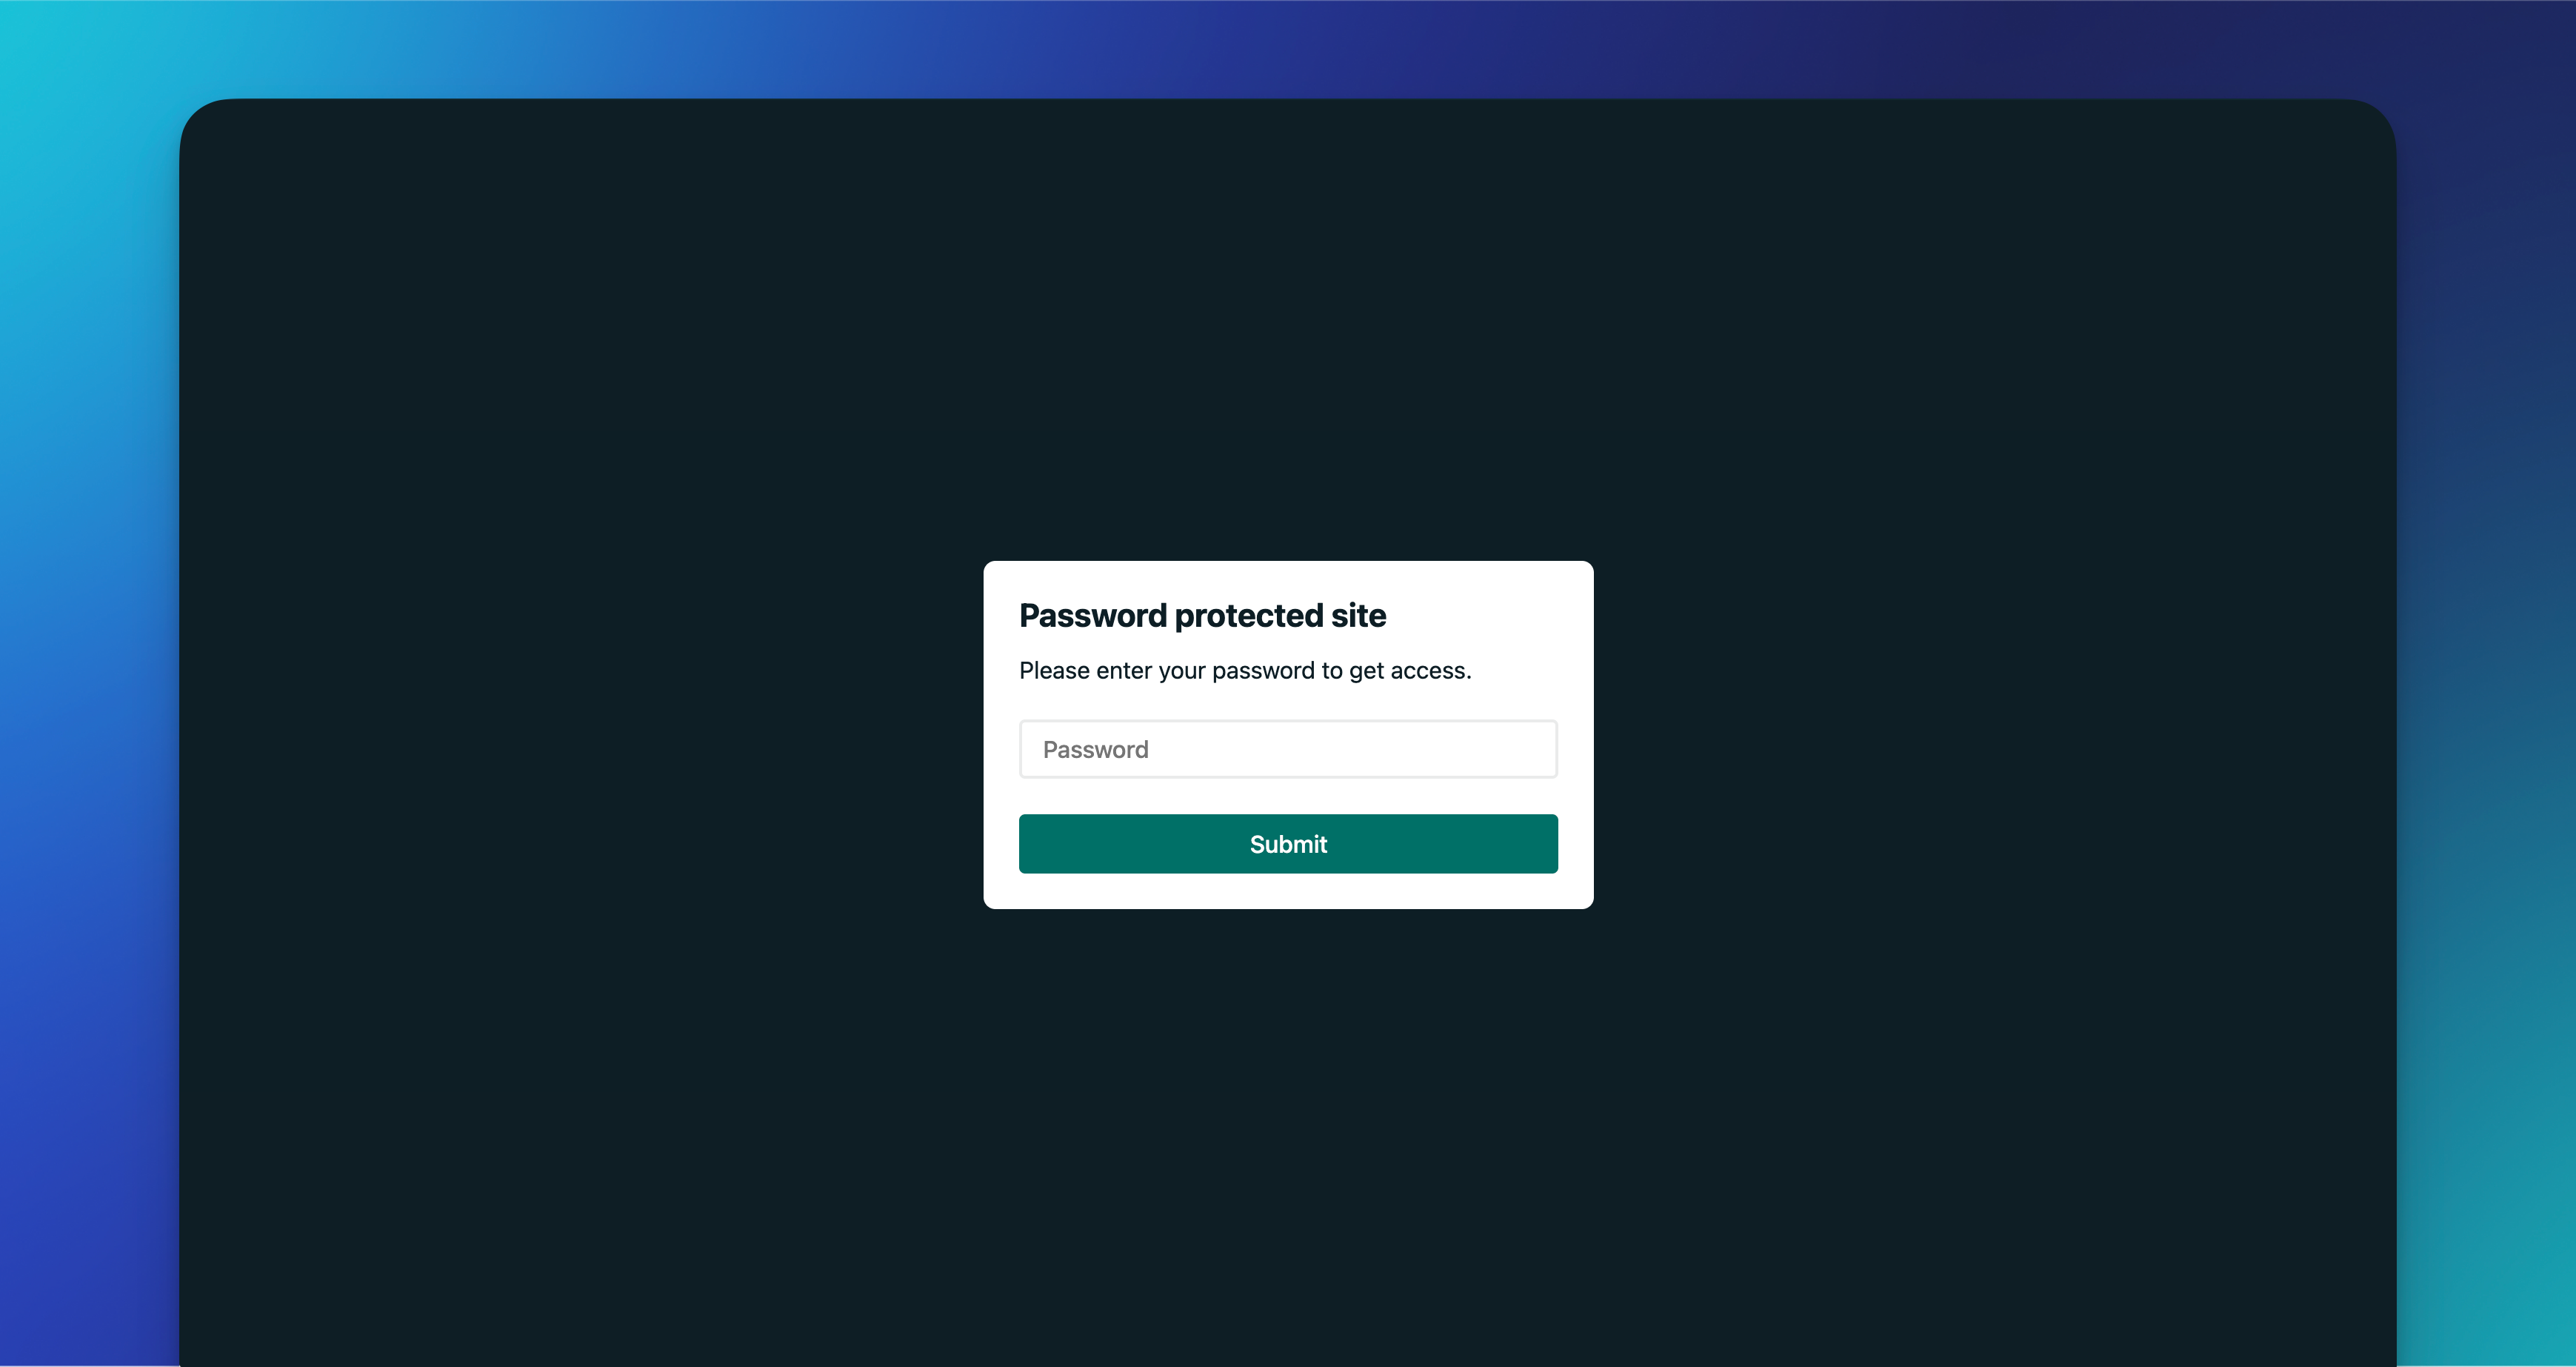
With Basic protection, visitors see a simple password prompt when they load the site. Once they enter the password, they’re in.
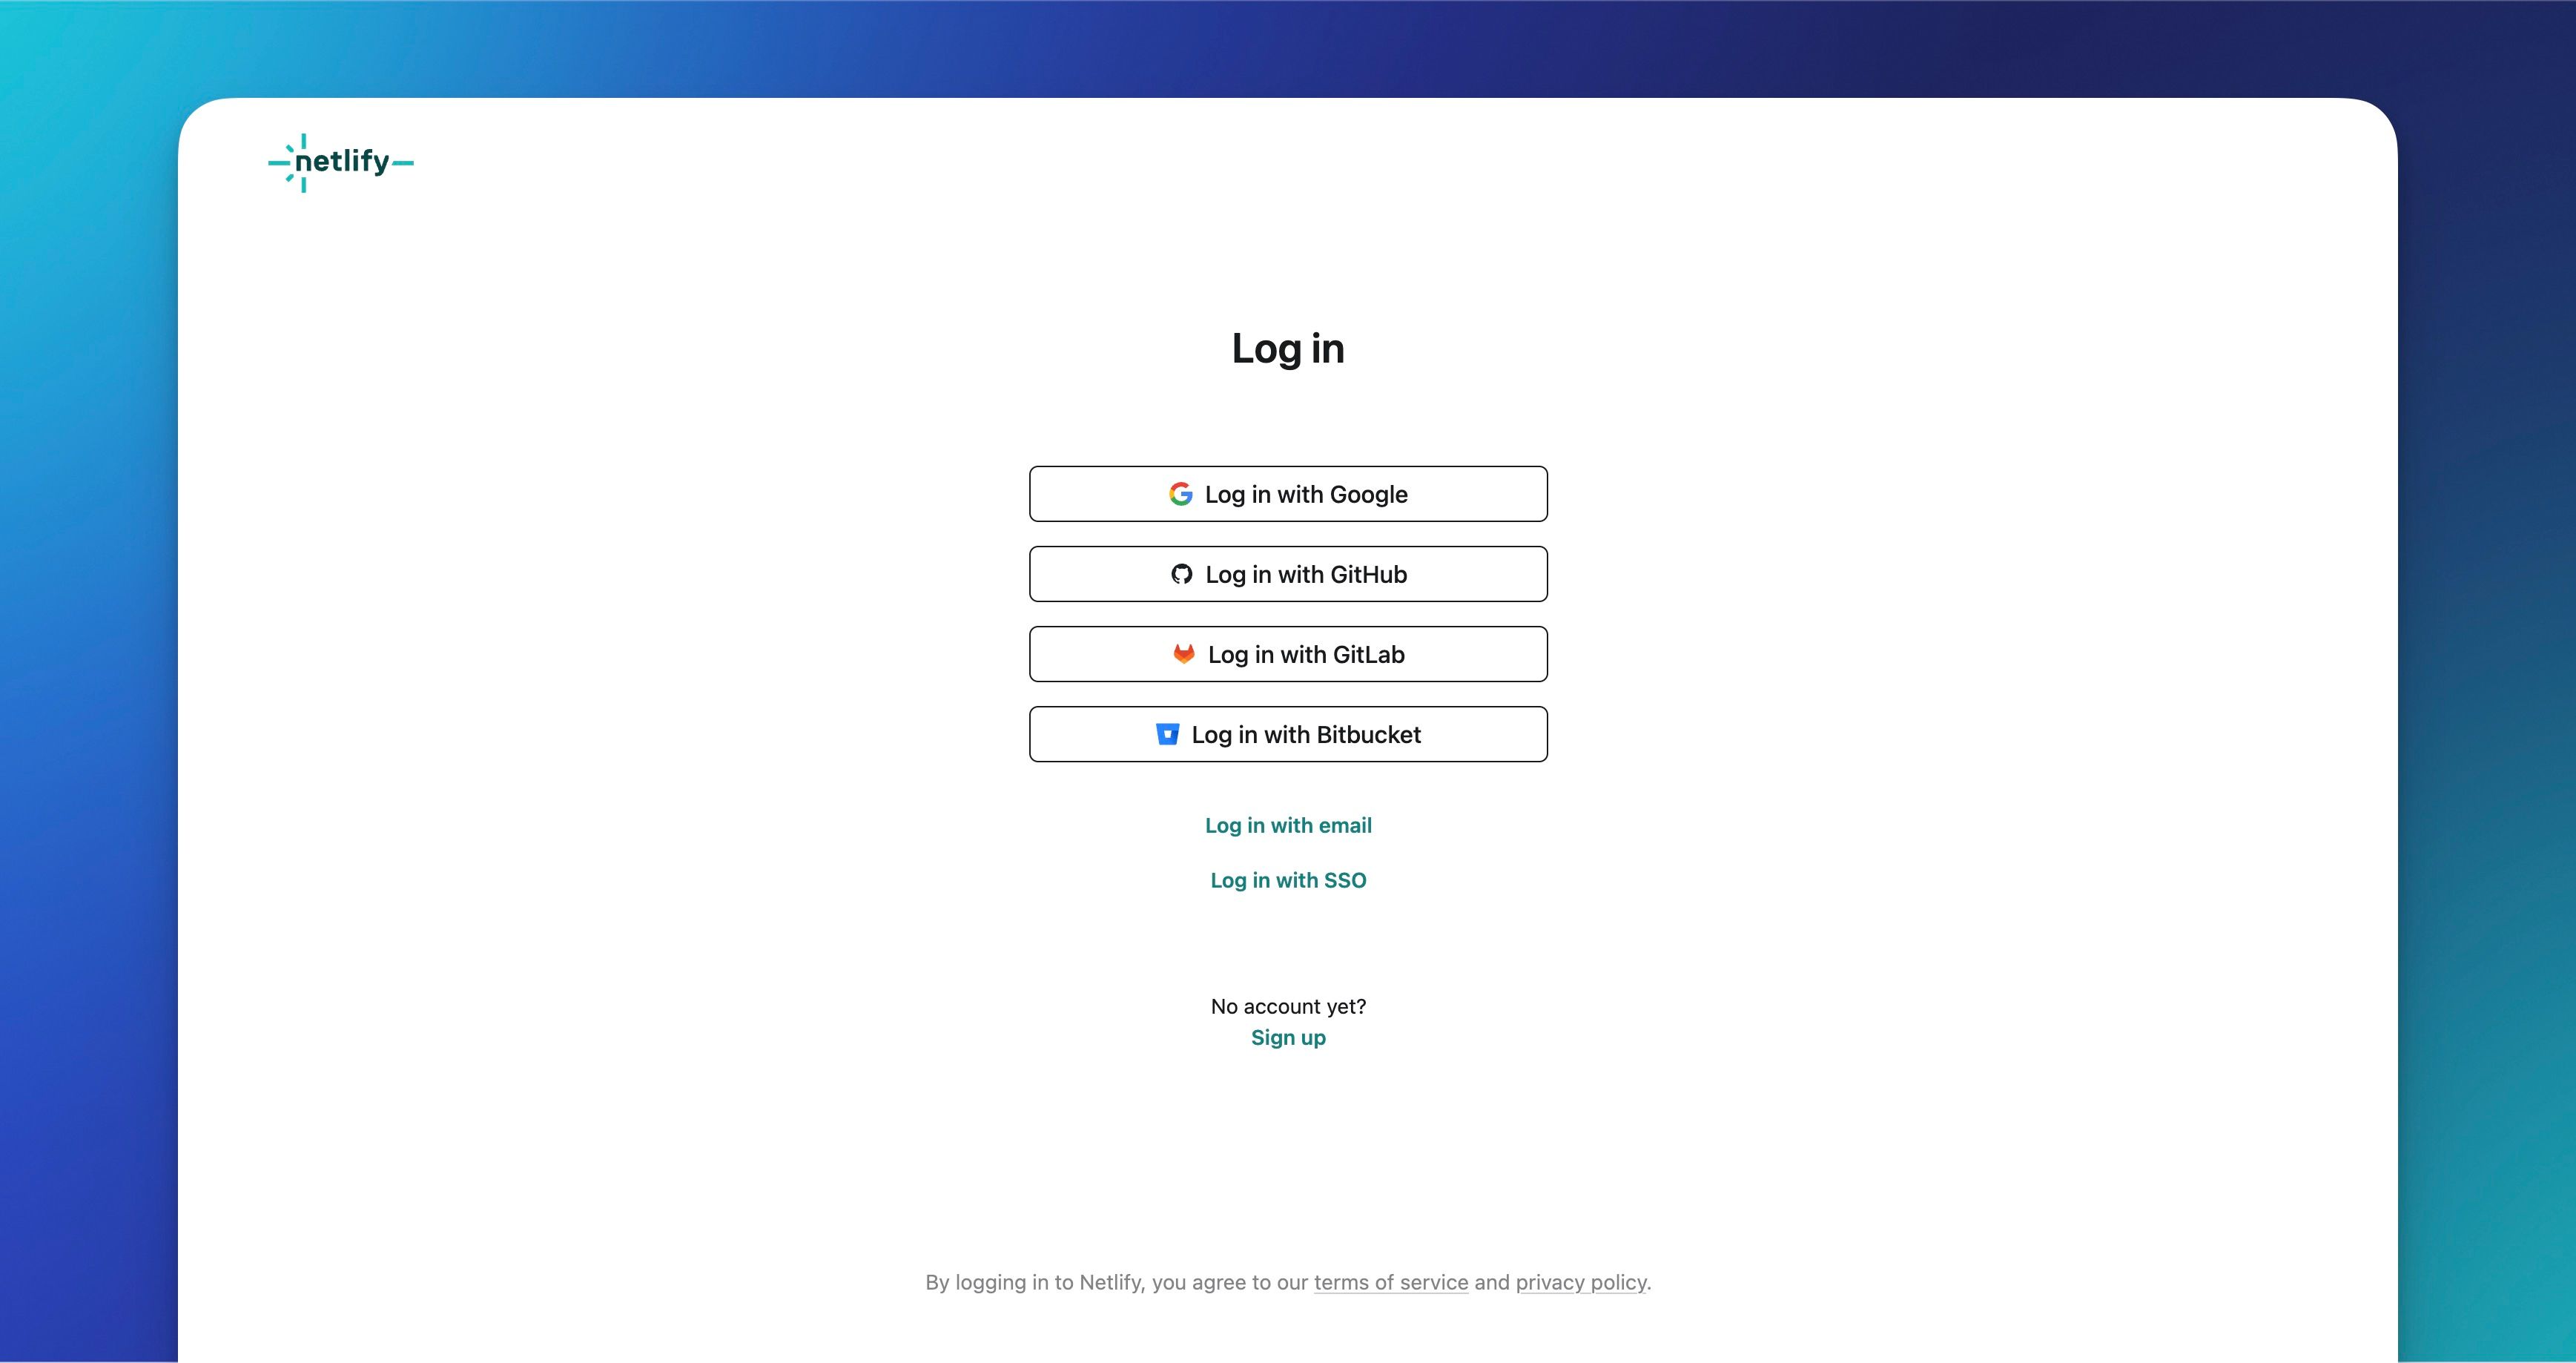
With Team protection, visitors are asked to log in with their Netlify account. If they’re part of your team, access is granted. If not, they can’t proceed.
Basic authentication via custom HTTP headers
Password protection is polished and easy, but what if you’re on the Free or Personal plan and still want to keep a site private?
Not to be confused with Basic protection (the Pro-level feature described above), Basic authentication functions more like an .htaccess rule or other config-level approaches you might have used with a traditional webserver. Instead of flipping a switch in the dashboard, you define access rules directly in your project code using a _headers file.
This method is available on all Netlify plans, and while it’s more bare-bones than the aforementioned solution, it can be a handy way to quickly lock down a demo or staging site.
⚠️ Important note on security. This approach is not without risk. When you hardcode sensitive values into any file in your repository, those values live in plain text. If your repo is public, those credentials are exposed to anyone who looks. Even in private repos, these values can be leaked through logs or shared unintentionally. Make sure you understand the impact before implementing this in any environment that matters to your business or your clients.
-
Create a
_headersfile:
Add a file named_headersto the root of your project. -
Add your Basic Auth rule:
For a site-wide rule, include the following:/*
Basic-Auth: user:passwordFor a page-specific rule, you can specify the path like this:
/admin
Basic-Auth: user:password -
Replace
userandpasswordwith the exact credentials you want visitors to use. Remember, you should never commit critically sensitive values to your repository. -
Commit your changes and push them to your repository to trigger a new Netlify deploy.
From now on, every route matching your custom header will prompt for the username and password you defined.
A safer alternative
Did I mention that it’s generally a bad idea to commit anything of actual sensitivity to your repo?
Hardcoding credentials in your repository is risky. Plain-text secrets can leak through forks, logs, screenshots, CI artifacts, or a rushed pull request. If you’re locking down a short-lived demo and the stakes are low, committing auth credentials to a _headers file might be acceptable. If you’re even a little uncomfortable with that, there is another way.
Thanks to Netlify’s extremely flexible build system, we can actually have a build plugin generate (or append to) the _headers file at buildtime.
How this works:
- You store a credential (e.g.,
user:password) in a Netlify environment variable. - A small script runs after your build and generates the
_headersfile using that value. - Nothing sensitive is committed to git, and you can rotate the variable without touching the code.
Create a file in your project root called generate-headers.js with the following contents:
import fs from 'fs';
import path from 'path';

const distDir = './dist';
const headersFile = path.join(distDir, '_headers');

const basicAuthCredentials = process.env.BASIC_AUTH_CREDENTIALS;

if (!basicAuthCredentials) {
  console.log('BASIC_AUTH_CREDENTIALS not found, skipping _headers file generation');
  process.exit(0);
}

const headersContent = `/*
  Basic-Auth: ${basicAuthCredentials}
`;

if (!fs.existsSync(distDir)) {
  fs.mkdirSync(distDir, { recursive: true });
}

fs.writeFileSync(headersFile, headersContent);
console.log('Generated _headers file with Basic Auth credentials');
Next, create or update netlify.toml with the following build command. This will tell Netlify’s build servers to invoke generate-headers.js at the successful conclusion of your next build…
[build]
  command = "npm run build && node generate-headers.js"
Next, head over to your project configuration in Netlify and add a new ENV variable BASIC_AUTH_CREDENTIALS with the value of your user and password, delimited by a colon (e.g. user:password).
Now commit and push these changes to your repository and Netlify will take care of the rest.
If the BASIC_AUTH_CREDENTIALS variable is present in your deploy context, a new _headers file will be created during the build process. No credentials stored in Git. Risk averted.
In summary
When it comes to keeping work-in-progress out of the public eye, you’ve got two clear paths on Netlify:
- Password protection is the simplest and most professional option, built right into the dashboard for Pro plans and above. It’s designed for client-ready previews and internal reviews where ease of use and polish matter most.
- Basic authentication, by contrast, is more involved but can also apply granular controls on a per path basis. It’s flexible and works everywhere, but may be less secure and requires manual orchestration.
Both approaches help you control access without slowing down your workflow. The one you choose depends on your audience and your goals: polished previews for clients, or quick lockdowns for temporary builds.
If you’re ready to give your clients and teammates a smoother experience, consider upgrading to the Pro plan to enable password protection today. It’s a small change that makes sharing work-in-progress feel every bit as professional as the final launch.